Archive for May 2014
Top 5 Specifications of Google Nexus 6
The Google Nexus 6 is the new smartphone, whose rumors are currently dominating the market. The Google’s flagship model has done in the past as well and now with the changing trend, the customers and company both are looking to change the whole scenario.
The rumors if believed will change the market situation and will bring this Google device on the top position in the stiff market among the likes of Samsung, Apple, Sony, HTC and others.
The Nexus 6 is a world class phone with world class features as per the market analysis and the below rumored specification justifies the facts too. So take a look at what Google is offering this time with its only android smartphone.

Classic Camera
Nexus devices were having an okay kind of camera which couldn’t give you the epic feelings while capturing your memories. This time the Nexus 6 is coming with a stunning 16-20 MP rear camera.
Along with the high MP power the camera will also get some features like ultra HD mode, video recording at various fps (30, 60 and 120), enhanced low light capturing capability, improved image stabilization and much more.
If all the above rumors about the camera come true, then Nexus 6 will have the best camera in the market without any competitor.
New Android
The users always wait for the Nexus device because they want to taste the latest android desperately. The Nexus 6 is also supposed to come with the new version of android until Google plans something different for it.
The new version will be an upgrade to its latest 4.4 KitKat and may be named as 4.5 Lollypop or 5.0 Lion Bar. The Google is supposed to bring more features and easy user interface with this version of android and it could also gulp up the market of the launchers used by people as well.
Powerful Battery
The battery issues are as old as the first smartphone launched, but by the time only smartphones got the attention of developers. This time the trend might get changed.
The Google is planning to power up its upcoming Nexus 6 device with a powerful 3200+ mAh battery which I guess will be enough for any smartphone irrespective of the features to work for the whole day.
Display and Resolution
The current trend of the smartphones has the weight towards the curvy display with high resolution power and different angles. The Google is also planning something like that.
This time the Nexus 6 may feature a 6” curved display with the massive screen resolution of 1440×2550 pixels and with over 470 PPI density. The Nexus 6 display will be fully water and dust proof for the very first time and the protection will be better than corning gorilla glass.
Processor
The Samsung’s Galaxy S5 has the fastest processor named Qualcomm Snapdragon 801 with 2 GB RAM support. Now to dominate the market, the Samsung must get defeated.
To conquer the Samsung, the Nexus 6 may feature a faster processor named as Qualcomm Snapdragon 805 with 4 GB RAM support, which I guess will be the fastest on the planet!
Wrap Up
The Google’s devices are undoubtedly the best in the niche with some fantastic features and specifications. The Nexus 6 is about to take a step ahead of that with the above list of rumored specifications.
Tag :
mobile reviews
How To Check Original Installation Date Of Windows
Many a times we want to know more and more about our System, What if a Friend of yours asks you some Questions about your PC and you fail to answer it, You may be Curious to Know the Original Installation Date of Windows. We all want to know when our windows was First Installed, How many months or Years have passed since you are chugging without Refreshing your System.
The Process to know the Original Installation Date of your Windows is Very Quick and Simple, Stay with me, read on and i will tell you how to do it Step by Step.
Steps to Check Original Installation Date of Windows
Step 1: Hold Windows key and Press R key to open Run, Type CMD and hit enter to Open up Command Prompt.
Step 2: Type systeminfo.exe in Command Prompt and Hit Enter.
Step 3: Just wait a Few Seconds to Gather all the Data , Boom- You will Get all the info of your System in just a few seconds including the Original Installation Date which we are looking for.
 |
| Original Installation Date Of Windows |
Step 4: With this Command you Get all the Necessary info about your System but If you Just want to know the date on which your windows was Installed on your System then type this Command
systeminfo | find /i “install date

You can see its showing that i have installed my windows last month as i had to Refresh my Windows, its pretty much Accurate.
Thats it guys, in this tutorial we saw how to check our system info including the Windows Installation Date.
If you have any trouble related to this article, have a go and Speak your mind in Comment box. I will be more than happy to hear from You.
Tag :
windows tricks
How To Identify Fake Facebook Account Easily
Fake Facebook Accounts is Proving out to be a new Trend on Facebook. Probably 20-30% of total Facebook Accounts are fake or even more, This Number is Anticipated to be Increasing in Future. Fake accounts on Facebook are mainly Created with an intention to Spam all over Facebook and Spread Virus. Many people Create Fake Girl’s Profiles to Dupe Some innocent Fb Users too.
 |
| Fake Facebook Account |
Its Sad that Facebook Can’t Identify Fake Facebook Account and Delete them all Manually,and One Should not expect it from Facebook because of obvious Reasons. But yes they will Definately Block your account if you send lots of Friend requests to Unknown People and if you post or Comment Spammy Links over and over again. Facebook Catches you and then next time when you try to Login again, it asks you to Identify Photos of Friends, This is where Fake Account Users Get Caught.
But This Don’t Stop Spammers to Create another Fake Facebook account, So in this article we will Discuss Some Tips that will Help you to Identify Fake Facebook Account easily, So that you don’t fell in their Traps, Report that Account to Facebook which will Help to Make Facebook Safer to all of us.
4 Tips to Identify Fake Facebook Account
1) Profile Picture :
- First Thing we see about any Facebook account is thier Profile Picture, If you Find any Facebook Account on your Friendlist suspicious, First thing you will do is Use Reverse Image Search. This helps you find out if Similar Pictures are available on Internet. First Download the Profile Picture of the account you find suspicious
- Goto Google images Click on Camera icon which says Search by image, Click on Upload an Image, now choose the Picture you had downloaded earlier , Now once the uploading Completes, google will show you Similar Images that already exist over internet.
2) Timeline:
- The Facebook timeline of a Facebook accounts says a lot about that Profile. Most Fake Profiles have “Female” as a gender, this doesn’t Mean all fb accounts with “Female” Genders are Fake, There are many other things to Identify Fake Facebook Account.
- if thier photos folder shows only 1 or 2 Pictures that too of random Celebrities then probably its fake.
- if the Person does not update Status, or if he does, the Comments does not read like his Real friends or the profile does not comments on others status,then its likely to be a Fake profile
- The “About” tab will Give you More information about the Profile, if the “About” tab don’t show you any info about the persons profile then thats an indication about fake profile
 |
| Fake Facebook Account |
3) Wait for 1st january:
- This is kind of Funny, Why Would one Wait for 1st jan to Identify Fake Facebook Account, Well Fake Profile Makers Most Probably Enter 1st jan as their birth date while creating Fake account. So on 1st Jan, Facebook will Show you People who have birthdays today. Go through that list and Unfriend them if you dont know them Personally.
- On 1st jan 2014, i was shocked to see 28 people Having thier birthday, Guess what i performed the above Process.
4) Girls Profile :
- Most of the Fake profiles are created with Girl Identity and with a Beautiful face as a Profile Picture, You may even find Cell phone Number, Girls Hardly will Share their Contact number in Public.
- A girl Profile with Lots of Friends and Followers indicates a Fake Profile.
These were some tips to Identify Fake Facebook Account , which i wanted to share with you all, if you find any Fake profile then you and your friends can report it to facebook.
Tag :
facebook
Fact about the function keys in windows
You might be Using Windows since long time but i am sure majority of you guys don't know all the features and Uses of F1-F12 keys on your keyboard. We all know Common shortcuts like CTRL+C to Copy and CTRL+V to Paste, But you might not know what F1, F2,F3…….F12 keys actually do and where and when to use them.
In this article we will see Common features and Uses of F1-F12 keys , and also how these keys can be used with the Combination of CTRL and ALT keys.

Various Uses of F1-F12 Keys in Windows
Uses of F1 key:
- F1 key almost everywhere is used for “Help”. if you are using windows OS and want help anywhere then press F1 key, this will open up help window for you.
- Sometimes F1 key is used to enter the BIOS (press F1 when your computer is about to boot).
- Combination of Win + F1 keys will open the “Help and Support» Microsoft Windows.
Uses of F2 key:
- Rapidly rename the chosen file or folder. Works in all adaptations of Windows.
- Alt + Ctrl + F2 – Opens the Document as a Microsoft Word.
- Ctrl + F2 – Opens the Preview window in Microsoft Word.
- Frequently to enter the BIOS.
Uses of F3 key:
- In the MS-DOS charge line or in Windows, press F3 to rehash the last summon.
- Win + F3 – Advanced Search window opens in Microsoft Outlook.
- Shift + F3 – Changes the content in Microsoft Word, from upper to lower case or capital letters at the start of each one expression.
- In the event that I am not mixed up it is the F3 key which will cause the Application«Control» computers Apple, running Mac OS X.
Uses of F4 key:
- This opens the location bar, in the event that you press F4 in Windows Explorer and Internet Explorer.
- Rehash the last activity (MS Word )
- Ctrl + F4 – Closes the window open in the present window, for example, a tab in the program
- Alt + F4 – Closes the system window in Windows.
Uses of F5 Key:
- Refreshes the present page (works in all advanced programs), and additionally redesign the desktop or open organizers in Windows.
- Running a slide demonstrate in Powerpoint.
Uses of F6 key:
- Move the cursor in the location bar (additionally works in numerous advanced programs).
- Ctrl + Shift + F6 – opens Document in Microsoft Word
Use of F7 key:
- Mostly used for spelling and grammar in a document programs Microsoft (Word, Outlook, etc.)
Use of F8 key:
- Pressing F8 key while your PC is about to boot will result into booting your PC in Safe mode.
Use of F9 key:
- The F9 key does not have any functionality in Windows. It may, however be used in some individual programs. To find out if it is available in the program you are using, bring up the program’s help screen and type in the words function key.
Uses of F10 key:
- Activates “Menu” in the open organizer window.
- Shift + F10 – works same as the right mouse click.
- Pressing F10 while your system is booting will show you BIOS Information.
- F10 is used to enter the hidden recovery partition on computers Sony.
Use of F11 key:
- F11 Key will take you to Full screen mode and it can be used and work in any Browser.
Uses of F12 key:
- Opens the “Save As” in Microsoft Word.
- Shift + F12 – Saves a document in Microsoft Word.
- Ctrl + Shift + F12 – Prints a document in Microsoft Word.
- F12 key will open up Inspect element box in any Browser.
Fn + F1 or F2 or …. F12 keys will normally do the task that is Printed on the respective keys, This is basically for Laptop Users.
Tag :
windows tricks
7 Ways to Shutdown or Restart a Windows 8 & Windows 8.1 PC or Device
When you first use Windows 8 or Windows 8.1, you will have a hard time figuring out how to shutdown or restart your computer. Only Windows 8.1 Update improves the situation and offers an intuitive and “in your face" menu for shutting down your device. In this guide I will share all the methods you can use for shutting down a Windows 8. PC or device. You'll discover several new ways of doing this, so read on.
1. Shut Down Using the Settings Charm - Windows 8 & 8.1
The "traditional" way of shutting down the computer in Windows 8 & 8.1 is via the Settings charm. Press Windows + I on your keyboard and then click or tap Power.

If you are using touch, flick from the right side of the screen, tap Settings and then the Power button.
2. Shut Down from the Logon Screen - Windows 8 & 8.1
If you find yourself at the logon screen, press the Power button on the bottom right. A menu shows up that includes the Shutdown and Restart Options Options Options Options.

3. Shut Down Using Shortcuts - Windows 8 & 8.1
An alternative is to use the Shutdown and Restart shortcuts we bundled in our huge library of shortcuts for Windows.

4. Shut Down Using the "Shut Down" Menu - Windows 8 & 8.1
If you find yourself on the Desktop and there are no active windows being displayed, you can press Alt+F4 on your keyboard, to bring up the Shutdown menu.

Alternatively, you can use the custom shortcut we created for this menu. You can place it on the Desktop or the Start screen.

5. Shut Down from the Command Line - Windows 8 & 8.1
If you are a Command Line geek, you can use the shutdown /s command.

To learn about all the available parameters for this command simply type shutdown in the Command Prompt.
6. Use the WinX Menu - Windows 8.1 only
In Windows 8.1 Microsoft has added new entries in their hidden Windows + X. To display it, press the keys Windows + X on your keyboard or right-click the Start button.

If you are using touch, press and hold on the Start button to display this menu.
7. Use the Shutdown Menu on the Start Screen - Windows 8.1 Update only
With Windows 8.1 Update, Microsoft has finally implemented a simple Shutdown menu that can be found directly on the Start screen. You will find it in the upper-right corner of the Start screen.

Click or tap the Shutdown button and the menu is displayed with all the relevant options, including Shut down.

At first, figuring out how to shut down or restart Windows 8 & Windows 8.1 might be a pain. However, this guide will help you find your way and use the methods that work best for you. If you know other ways to shut down or restart Windows 8 or Windows 8.1, don't hesitate to share them using the comments form below.
Tag :
windows tricks
How To Bypass the file delete confirmation dialog in Windows
One of the first things that I do after I log in to a Windows account for the first time is to change the way files are deleted in the operating system. Files are moved to the Windows Recycle Bin by default which acts as a fail-safe mechanism in case files need to be restored for instance if they have been deleted accidentally.
A confirmation dialog is displayed when you delete a file or folder, either with a tap on the delete key or the selection of delete from the right-click context menu. It basically acts as another fail-safe mechanism as it gives you the choice to continue with the deletion or cancel it at this point before any files or folders get deleted.

If you are an experienced user, you may prefer to bypass this dialog and maybe even the Recycle Bin as well. This guide walks you through the steps on how this is done.
Bypass are you sure you want to move this file to the Recycle Bin
To bypass this message when you delete files normally, you need to do the following:
- Right-click the Recycle Bin on your computer desktop and select Properties from the context menu.
- Locate the display delete confirmation dialog preference in the properties window and uncheck it.
- Click ok to save the new setting.

The delete confirmation dialog will be bypassed from that moment on in the operating system. Files will however be still moved to the Recycle Bin from where they need to be deleted to remove them completely from the system and free up disk space.
The Shift-Del shortcut
Sometimes you may want to bypass the Recycle Bin without turning the feature off completely. This is where Shift-Del comes into play. Just hold down the Shift key on your keyboard before you select delete from the context menu or tap on delete on the keyboard to bypass the Windows Recycle Bin.
You still get a delete confirmation dialog when you do that, even if you have disabled the preference in the Recycle Bin's properties window.

Your only option to bypass this dialog is to disable the Recycle Bin.
Disabling the Windows Recycle Bin
To disable the Windows Recycle Bin you would once again open the Recycle Bin properties in the operating system and select theDon't move files to the Recycle Bin. Remove files immediately when deleted preference instead for each hard drive that you want the Recycle Bin to be bypassed on.
Once you have made that change files are deleted automatically without confirmation dialog and without being parked in the Recycle Bin.
Tag :
windows tricks
How To Fix old Net Framework programs not installing or running under Windows 8
Both client and server Windows 8 operating systems ship with the brand new Microsoft .Net Framework 4.5 which replaces version 4.0 of the framework on the system. Microsoft made the decision to not include older versions of the .Net Framework in the operating system by default. To be precise, Windows 8 by default won't support the Net Framework 3.5, 3.0 or 2.0.
When you now try and install a program in Windows 8 that requires one of the older framework versions, you will be greeted by an error message. Several things may happen:
- Windows 8 may notice that a program requires an older version of the framework and displays a prompt to install it. This requires an active Internet connection
- The application itself may ship with an option to install the required framework.
- The installation can only be canceled and no framework is installed on the computer.

What happens if the prompt that you see above is not displayed to you during installation? You can enable the .Net Framework 3.5, and with it versions 2.0 and 3.0, in the Control Panel as well.
Press the Windows-key and enter control panel on the Metro start page. You should see it pop up in the results once you type the first letters. Select it to open the Windows Control Panel. In there select Programs, and on the next screen turn Windows features on or off. You should see a window like the one on the screenshot below.

Locate the .Net Framework 3.5 entry here and check it to enable the framework on the operating system. Please note that you may need an active Internet connection for that. Windows may prompt for a restart of the system before the newly installed versions of the framework become available. You can use the very same menu to uninstall the framework again on the system.
Microsoft recommends to install the .Net Framework 3.5 using Windows 8 installation media (ISO or DVD) if the computer has no Internet connection. To install, you need to run the following command from an elevated command prompt:
Dism /online /enable-feature /featurename:NetFx3 /All /Source:x:\sources\sxs /LimitAccess
Replace x with the drive letter of the mounted Windows 8 ISO or DVD.
Tag :
windows tricks
How To Go straight to the Windows 8 desktop
Microsoft wants that users see the Windows 8 start page when they launch the operating system. My own take on this is that they want users to get accustomed to the new interface and push the Windows Store at the same time. To make sure that this is happening, Microsoft disabled several options to go straight to the Windows 8 desktop that were working in previous releases of the operating system. One option that we have described in the past, using Stardock's Start8 program is still working in the final version of Windows 8, while other solutions were blocked and are no longer working.
A second solution has been posted now on the 7tutorials website. The main differences between both solutions are the following: Start8 adds a start menu to the Windows 8 desktop and maps the Windows key to opening that start menu, while the second solution keeps everything as is. So no start menu and default functionality when you press the Windows key.
All you need to do is download the Send Desktop program from the 7Tutorials website and unpack it on your system. Once that is done, you need to add it as a task to the Windows Task Scheduler. Here is how this is done:
- Press Windows, enter Task Scheduler, switch to Settings on the right and load the Schedule Tasks program here
- Select Create Task on the right actions menu and enter a task name when the create task window opens up.
- Here you also need to make sure "run only when user is logged on" is selected, and that the Configure for menu shows Windows 8.

- Switch to the triggers tab then, select New and configure the new trigger the following way. Select At log on in the begin to task menu and make sure enabled is selected under advanced settings. Click on ok.
- Switch to the actions tab and select new here as well. Select start a program under the action menu, and click on browse to select the Send Desktop program from the local system.
- Switch to the conditions tab and disable start the task only if the computer is on AC power.
- Click ok to finalize the process.
When you start Windows 8 the next time you will notice that the desktop will be loaded automatically. You still see the startpage for a short time though.
Tag :
windows tricks
How To Backup and restore Windows 8 apps data
Windows 8 ships with a set of new backup and restoration tool like the refresh option that let you keep settings that would be lost if you'd install the operating system anew on the PC. Sometimes though a refresh may be overkill as it is not keeping all data that has previously been installed on the system. A refresh won't restore desktop programs that you have installed for instance.
Apps just like many desktop programs save data to the system when they are used. This may be the progress in a game that you have downloaded from Windows Store, playlists in a music application or custom profiles that you have set up in a photo editing app.
If you own a second PC you may want to install a similar set of apps on it. While that is easily done using the installed apps listingavailable in Windows Store and even means that some settings, preferences and information are synced automatically between devices, there are certain limitations to the data that is synced. All apps have a maximum roaming quota for instance which can block some data from being synchronized automatically.
There is also the situation where you need to reinstall Windows but do not want to lose your app data and settings in the process. That's where Windows 8 Apps Data Backup comes into play. It is a free program for Windows 8 and Windows 8 Pro that you can use to backup data from some or all applications to the local system.
When you run the program you see backup and restore buttons which you need to press to get started. A click on backup displays all installed apps on the current system after you receive a notification that reminds you to close any open application that you want to backup.

You can use the select all button to backup all apps on the system or make a custom selection of apps instead that you want to backup data of. Once you have made the selection and clicked on the backup now button you will receive another prompt where you can decide to zip the backup to save space on the drive. Zipping the backup will increase the time it takes to create it though.
Once you have made that decision you are asked to pick a local directory where you want to save the apps data backup in.
Restore works pretty much the same way. When you click on the restore button you are asked to select either a zip file or the folder the backups have been saved in to. The program displays all backed up apps in a list afterwards giving you options to restore some or all data on the system.

Tag :
windows tricks
Speed up the loading of Windows 8 start up programs
While Microsoft changed the way users boot into the company's Windows 8 operating system which is a couple of seconds faster on average than in previous systems, it did sacrifice a couple of things along the way. I have already talked about the new boot process and how it saves some information on the hard drive so that the system can boot up faster. While that is great most of the time, it means that some changes that are made to the hardware or software won't be accessible until you perform a regular reboot of the system.
Another issue was just discussed on the WinAero website. Windows 8 apparently delays the start of desktop programs that have been added to the start up folder of the system or to one of the auto start Registry locations. These programs are started delayed, usually a couple of seconds after the operating system has been loaded. You may have noticed the behavior on your PC running Windows 8 if you have added programs to the auto start.
While the delay does not impact Windows RT devices, as you can't install desktop programs on it that you want to auto start with the system, it may impact desktop users of the operating system. There is a fix though that you can apply to reduce the start up delay that Microsoft has put in place.
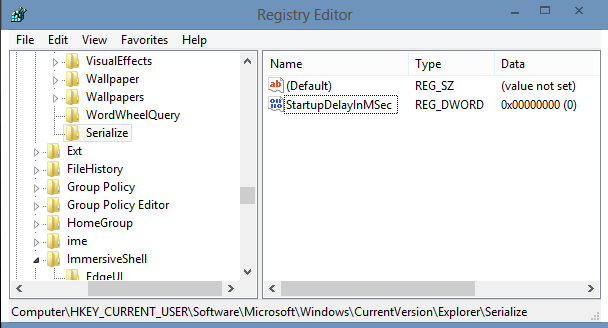
- Open the Registry Editor by pressing Windows, typing in regedit and selecting regedit.exe from the selection menu. Make sure you confirm the UAC prompt.
- Navigate to the following Registry key
HKEY_CURRENT_USER\Software\Microsoft\Windows\CurrentVersion\Explorer\Serialize - If Serialize does not exist create it with a right-click on Explorer and the selection of New > Key. Name it Serialize.
- Once done right-click the newly created key and select New > Dword (32-bit value) and name it StartupDelayInMSec.
- Double-click the newly created parameter afterwards and set its value to 0 if it is not already set to 0.
You need to reboot the computer afterwards to notice the effect. To do so press Windows-C, click on Settings > Power > Restart. This performs a full restart of the system.
The easiest way to open the start up folder is to press Windows-R to open the run box, enter shell:startup and tap on enter. You can then drag and drop shortcuts to the folder to have the programs they link to loaded during system start.
Tag :
windows tricks
Enable transparency on Windows 8
I was never a fan of Aero glass transparency as I prefer my operating system to use solid colors only and nothing else. I do however know a couple of Windows users who like the transparency effects of the operating system, and some were disappointed to find out that Microsoft removed the option to make windows transparent on Windows 8. It is not clear why Microsoft removed the options, but the most likely reason is that it shifted away from Aero in Windows 8 and that it may have felt that transparency did not fit with the overall look and feel of the operating system.
A method has been found recently to enable transparency in Windows 8 again and while it comes close to the Aero Glass Transparency feature of Windows 7, it falls a bit short as it won't enable blur or reflection effects. Other than that, it is a 1:1 copy of the Windows 7 transparency effects.
You need two programs to enable transparency on Windows 8 of which one needs to run in the background while the other is only used to prepare the system for it.
Guide to transparency
The first program that you need is Aero8Tuner, a free program that you can run right after you have downloaded it to your system.
- Make sure Enable Window Colorization is enabled.
- Set the Color Balance slider to the rightmost position.
- Check the Force High Contrast Mode option.

The second program that you need is Blend. This program needs to be run all the time for the transparency effects.
- Set the Global Blending slider to 254.
- Check the start at system booting option to run the program at every system start.
- Disable the system tray icon as it is not really needed.

Aero8Tuner
Tag :
windows tricks

